Schedules Application
End-users prefer simple applications allowing them to review all the information for their daily use without much effort. When looking for a slot it is difficult to have a picture of the week or month schedule based solely on a list of items. An easier way to quickly grasp how the month will be is looking at the appointments split in a Calendar view. On OutSystems Forge, the OutSystems community shares a few applications and widgets to apply a Calendar layout to a list of events. In this article, we will exemplify how to implement the Full Calendar widget on a pre-created application.

Entity Diagram
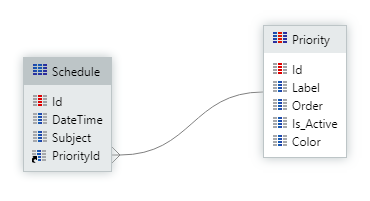
To follow this how-to, you need to have an application already created with two entities: the Schedule entity, which will be responsible for saving our appointments with the information about the date-time, the subject, and the priority of the Appointment; The Priority entity, which keeps an enumeration of values (Low, Medium, or High) to be chosen by the end-user when defining a priority of one event.
You will need to create a Tradicional Web application with a responsible module and the List and Detail screens to add some examples of events to be displayed later in the Calendar widget. Note: In case you are not familiarised with the creation of an application, database model, and screens, please check the OutSystems videos below, about these subjects:
Note: In case you are not familiarised with the creation of an application, database model, and screens, please check the OutSystems videos below, about these subjects:
- Web Applications in OutSystems
https://www.outsystems.com/learn/lesson/1793/web-applications-in-outsystems
- Data Modeling
https://www.outsystems.com/learn/lesson/1774/database-entities
- Basic Screen Development
https://www.outsystems.com/learn/lesson/1782/basic-screen-development
Install the FullCalendar 2
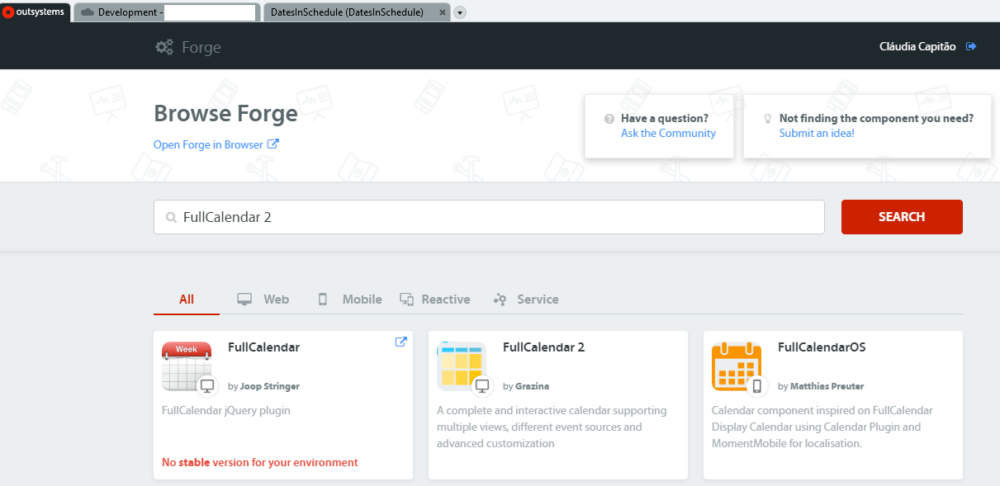
To create the Calendar layout, we will use the Full Calendar widget. The FullCalendar 2 is an interactive calendar supporting multiple views, different event sources, and advanced customization. To install it, go to the Forge and search for FullCalendar 2. Then install it on your environment.

Implement the FullCalendar
To consume the Full Calendar elements, you need to manage the dependencies of your application. Open your application and add the FullCalendar UI Flow and the newEventSourceData action to your UI module as dependencies from the FullCalendar module.

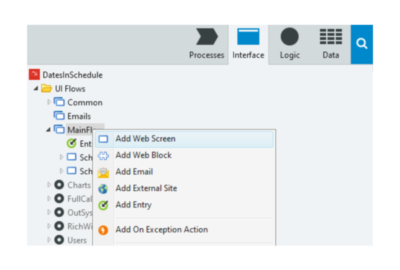
Create a screen to show your dates in the FullCalendar widget.
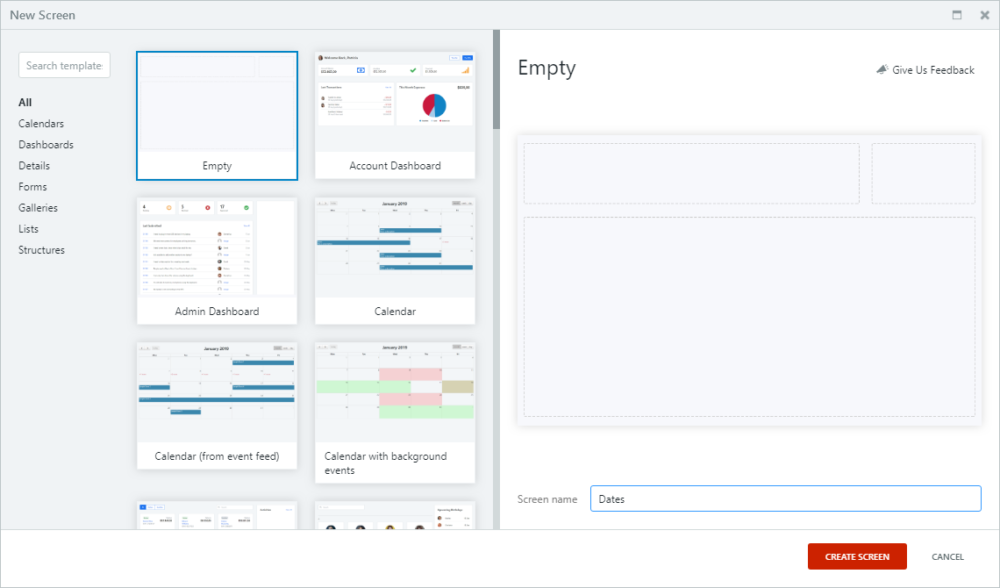
Choose an Empty screen template and call it Dates.
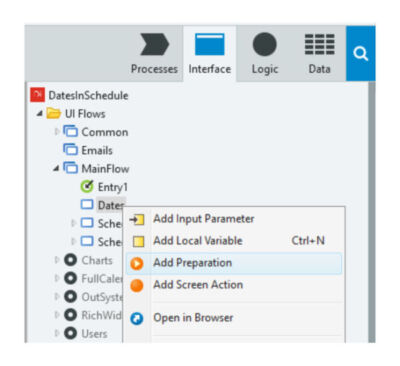
Our data is already saved in the Schedule Entity inside the database. To fetch the data on the screen, you’ll need to add a Preparation action to the screen. The Preparation will run its logic before the screen renders.
Drag and drop the Entity Schedule to the Preparation flow. This step creates an aggregate that will send a request to the server to fetch all records that exist in the Schedule Entity.
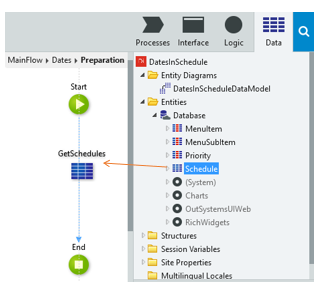
In the Interface layer, you can see the FullCalendar widget.

Return to the screen and drag and drop the Calendar widget inside of the MainContent of the screen.

The platform will show you an error on TrueChange.
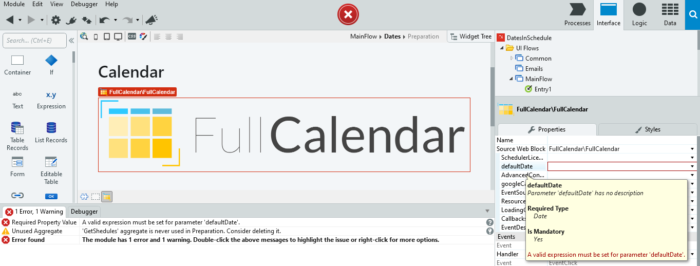
The FullCalendar widget needs a Default Date as a mandatory parameter. Add the function CurrDate() to the default Date property of the widget. The CurrDate() is a built-in function from OutSystems that will return in runtime the date of the server where the application is running.
Now that the default date of the calendar is defined, let’s assign the dates from the aggregate to the calendar. To do that, it is necessary to define the Event Sources property of the calendar through a List of Events.
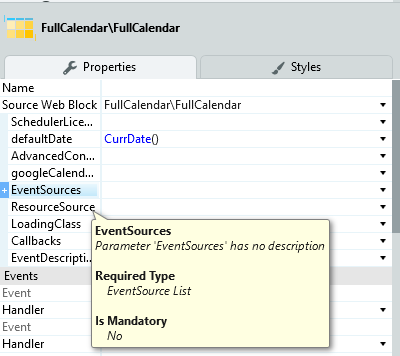
Open the Preparation of the screen. Drag and drop a server below the aggregate and search for NewEventSourceData.

Define the basic properties, such as Events like GetSchedules.List and the Id, Title, and Start as Schedule.Id, Schedule.Subject and Schedule.DateTime, respectively. If your data modeling has other attributes, you can assign them as well. As an example, if you define the period to the events, like a start and end day for your Events, just bound the attribute referent of last day of the Event on the property End of the newEventSourceData action.
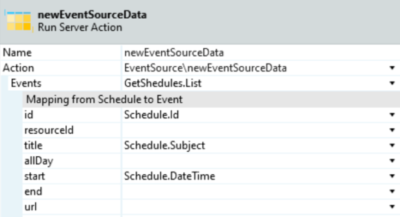
This action will return an Event List with all the attributes and properties that you defined above.
Return to the Dates screen and define the EventSources property as the output of the newEventSouceData action created on Preparation.

Publish your application and open the Dates screen on the browser to see the final result.
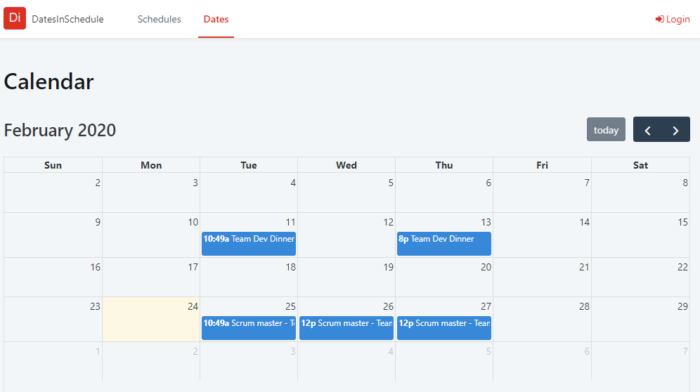
Note: if you cannot find your screen on the browser, try to open the screen directly from the Service Center. Just click on the Dates screen with the right button of the mouse and choose Open in Browser option.
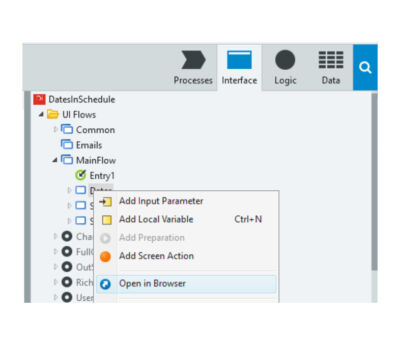
Or you can add the screen to the Menu bar. To create an entry of the Dates screen in the Menu bar, drag and drop the Dates screen inside of the Menu block.

Interact with the FullCalendar
The FullCalendar has a group of Events that allow us to design a behavior and the End-user to interact with the widget.
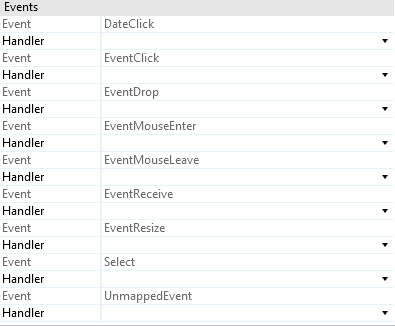
We will now implement two actions to allow the End-user to create a new Event when clicking on a specific date on the Calendar (DateClick), and the second action to edit an Event when the user clicks on it (EventClick).
Event Click
When the End-users click on Event inside the Full Calendar, they will be redirected to the Edit Screen (Schedule Edit) responsible for editing existing events through a Form widget.
On the Full Calendar widget properties, add a New Screen Action to the EventClick event.
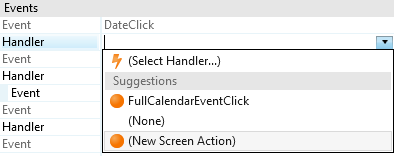
The action FullCalendarEventClick will be created. This event will receive all the details about the event that has been clicked.
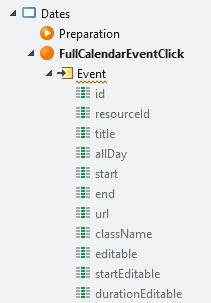
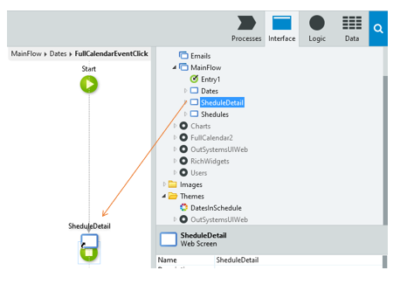
Open the FullCalendarEventClick action. Go to the Interface layer and drag and drop the ScheduleDetail screen on the End node.
The TrueChange will display an error message “Required Property Value A valid expression must be set for parameter ‘ScheduleId’.” To solve this error, you need to define what is the identifier of the Event record that you want to edit, when opening the ScheduleDetail screen.
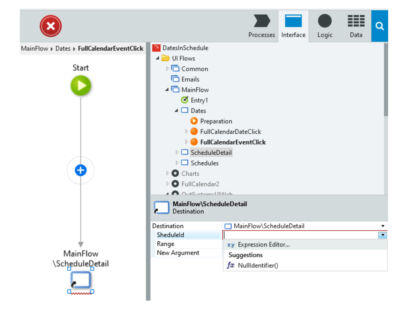
Open the Expression Editor to select the Event identifier value that is received on the FullCalendarEventClick action.

The Full Calendar widget defines the parameters as Text. However, the ScheduleDetail screen is expecting an Entity Identifier value. To solve this situation, you can use a Data Conversion Function, as defined below.
First, convert the Text to Integer number: TextToInteger(Event.id).
Then, convert the Integer to a schedule Identifier value: IntegerToIdentifier(TextToInteger(Event.id)).
Publish and try to edit one Event, when clicking on an Event inside of the Full Calendar widget.
Date Click
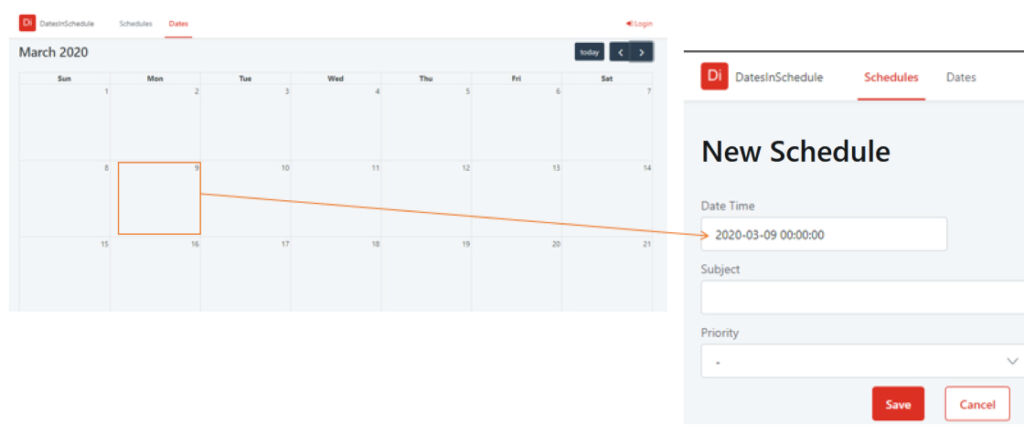
When the End-user clicks on a Date inside the Full Calendar, it will be redirected to the Edit Screen (Schedule Edit) to add a new event, however with the date clicked already defined in the Form widget.
On the Full Calendar widget properties, add a New Screen Action to the DateClick event.

The action FullCalendarDateClick will be created. This event will receive two parameters: the Range defines the Start Date and End Date of the event; and the AllDay boolean attribute defines if the Event will occupy a full day of work or not.
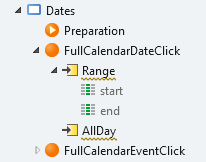
Like has been done before (FullCalendarEventClick), drag and drop the ScheduleEdit screen above the End node of the FullCalendarDateClick flow.
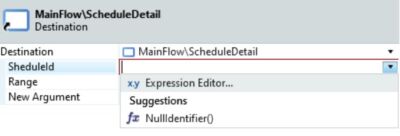
In this case, because we want to create a new event, the identifier of the event doesn’t exist yet. So you need to send to the input parameter the null value (NullIdentifier()).
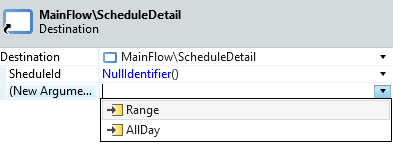
Taking into consideration that the new event must be bound to the date that the user clicked, we need to send that information to the ScheduleDetail screen. Add the Range parameter as a New Argument to the destination.
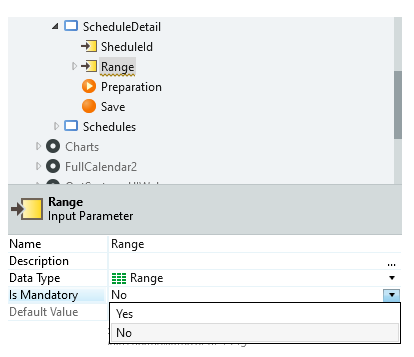
This parameter will only be used if the End-user clicks on the calendar. So you need to define as a non-mandatory attribute, to allow the correct navigation between the ScheduleDetail screen and other screens of your application without any issue.
On ScheduleDetail screen click on Range input parameter, and define the property Is Mandatory to No.
To guarantee that the input related to the Date is filled with the one that the End-user selected on the Calendar widget, we need to add some logic on ScheduleDetail Preparation. The Form widget is using the GetScheduleById aggregate as a source, so we will need to assign the value of the Date to this aggregate, but just in case that the Date is not empty.
Open the ScheduleDetail Preparation and drag and drop an IF widget below the GetScheduleById aggregate.
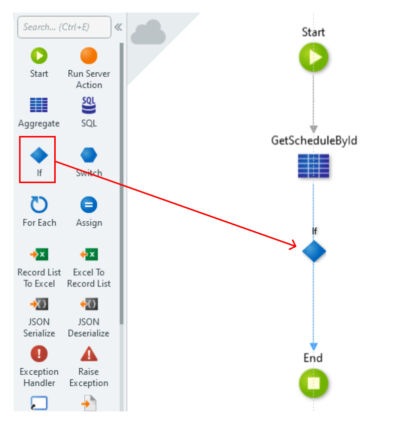
Define the label of the IF widget as “Start date is empty?” and the condition as Range.start <> NullDate(). The NullDate() function returns the NULL value to an attribute of type Date. With this condition, we are confirming if the Start date of the parameter Range is filled or not.

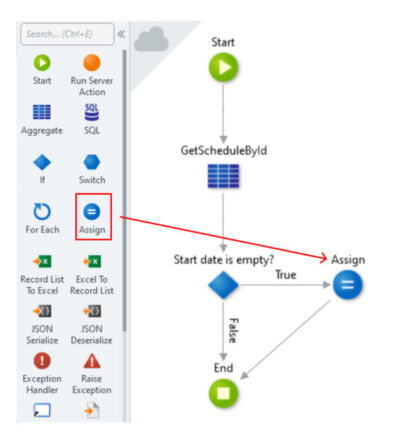
Drag an Assign with on the right side of the IF widget. Connect the True branch of the IF to the assign. Connect the assign with the End node of the flow.
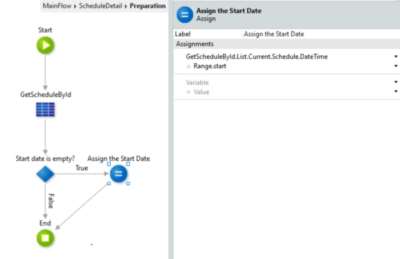
Define the label of the Assign widget as “Assign the Start Date”. Define the date that comes from the aggregate as the value of the range input parameter.
GetScheduleById.List.Current.Schedule.DateTime = Range.start
Publish your application and try to create a new Event, clicking on an empty date on the Full Calendar widget.
Advanced Configuration
The Full Calendar accepts advanced configuration and CSS Style, to create a better UX/UI experience.
Let’s start to add and change some of the CSS Style.

As you can see in the picture above, after the start time of the event, the letter “a” or “p” is being shown. The “a” represents “am” and “p” represent “pm”. On our Calendar, we just want to show the events per day. So to remove the information about the Time we can edit the CSS Style.
Open the Dates screen and click on the CSS style editor.
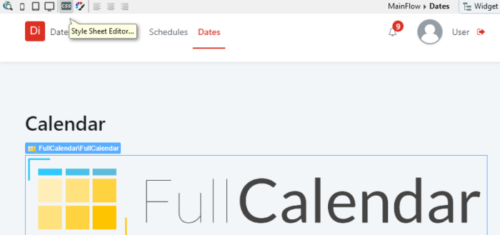
On the Dates Tab add the next style.
.fc-time{
display: none;
}
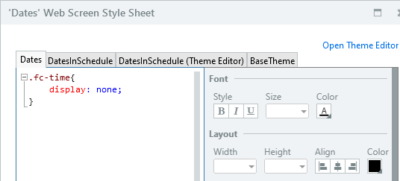
Now, let’s change the background-color of the Calendar widget, and give different colors to events having in mind the event priority value.
To the CSS added before, add a new class with the style that will define the background color of your Calendar.
.fc-body{
background-color: rgba(191, 245, 132, 0.50);
}
To add a color based on the priority, we can define an IF logic, on the color property of newEventSourceData. To do that, open the Preparation action of the Dates screen and add the logic below, on the Color property.
If(Schedule.PriorityId = Entities.Priority.High, “Red”, If (Schedule.PriorityId = Entities.Priority.Medium, “Orange”, “Green”))
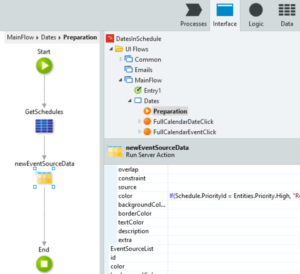
The final result of the Calendar will be similar to the image below.
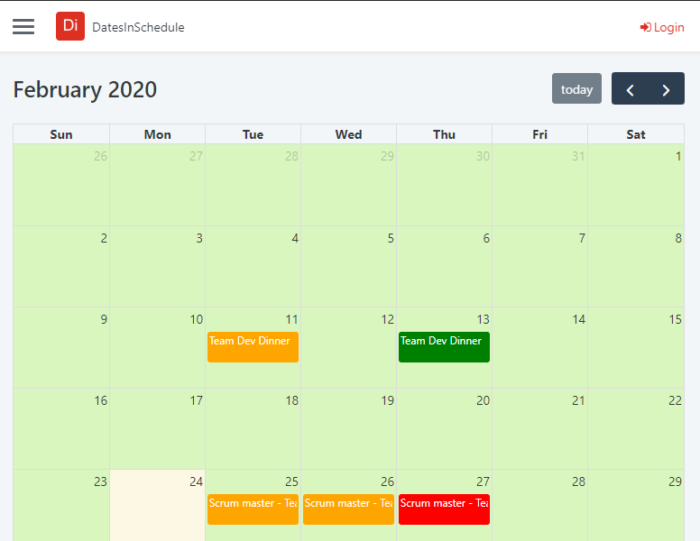
Now that you have the skills to display a range of Events in Calendar view, you can improve your skills, adding new styles and behaviour to your Full Calendar. To improve it, you can consult the Full Calendar documentation at https://fullcalendar.io/.


